
Deoxyribonucleic acid (or DNA) is the chemical novel of you. A little less than half of your story comes from a paternal inheritance (for some people this is a dad) and a little more than half of your story comes from a maternal inheritance (for some people this is a mom). Since your novel is “written” by two people (Dad and Mom), it helps give us geneticists and genetic counselors a more complete story when we analyze your novel along with your biological parents’. If they are not available, we can gain insight by analyzing your story alongside any sequels you may have written yourself (ie. your children).
Now that you know that background information, you have the tools needed to learn how we read your story without ever meeting you in person: DNA extraction. Recently, the most common form of DNA sample RGI receives is cheek swabs (otherwise known as buccal swabs). We also receive blood, semen, tissues, and more. For each of these samples, our goal is the same: remove as much DNA as possible so that we can amplify ¹ it and use it for testing. You may be wondering, “How can you find the DNA and get it to come out of my cheek cells?” For that, I will take you on a journey through DNA extraction and send you off with an experiment you can do on your own!
We will start by locating the DNA within your cells because one must know where something is before trying to get it out. Most DNA is located within the nucleus of the cell (if you remember from biology class, the nucleus is the big ball in the middle of the cell). In order to get to the nucleus, we need to break your cells open (also known as lysing). There are a couple of chemicals (also known as reagents) we need to accomplish this. Generally speaking, we begin the lysing process with a detergent. This detergent is able to break open cellular membranes and allow for easier access to the components inside. Next, we add enzymes meant to break down cellular components and other debris found in your swabs. These steps leave us with a small amount of liquid that has your DNA in it (yay!), but it is mixed with debris that we do not want (boo). This is why having a clean mouth before you swab is so important: it eliminates the amount of unnecessary debris in your sample.
To begin getting rid of these unwanted particles, we add in a precipitation reagent. Precipitation refers to a solid forming in the midst of a liquid. How do we get this solid to form? By using an instrument called a centrifuge. The centrifuge spins the liquid ~13,000 times per minute. The fast rotation causes whatever is in the liquid to separate by size and density (bigger, more dense particles go to the bottom of the tube while lighter, smaller particles rise to the top). In this case, the big, dense particles are mostly unwanted proteins that clump together in a white pellet (Figure 1). This separation makes it easy to keep the liquid with DNA in it and throw the unwanted protein pellet away. Even after this, there are more unwanted particles in the liquid. The way we remove those particles without removing DNA is with alcohols (not the drinking kind– that would be a disaster). This works because DNA will not dissolve in alcohol whereas other impurities will. Using this alcohol cleaning method, we separate the DNA by using the centrifuge again. However, the pellet that forms at the bottom of the tube this time contains your DNA (Figure 2). To finish off, we remove the alcohol and add a reagent that will dissolve the DNA. Voila! We are left with a small tube containing your novel dissolved into a liquid.
For every family member with extracted DNA, we are able to piece together a more complete, familial story. More family members can be advantageous because it allows us to see which genetic information is inherited maternally and which is inherited paternally. We then use this information to draft the best plan to test your embryonic cells for genetic abnormalities. However, we do not complete testing on a full embryo. We use amplified DNA extracted from cells in the trophectoderm layer of developing embryo(s). This biopsy is completed by a skilled embryologist and is commonly used in Preimplantation Genetic Testing 2, 3, 4.
Now that you have read about our DNA extraction process, I want to give you an accessible way to extract DNA on your own! You may not have the tools to extract your own DNA, but since everything that is living has DNA, you can find DNA in every living thing (including strawberries, yum). Linked here is a worksheet from The University of Queensland Australia that will walk you through each of the steps for extracting DNA from a strawberry 5. If you don’t have a test tube lying around at home (I know I don’t) you can use any glass container. For 10 bonus points, see how many strawberry DNA extraction steps you can match up with human DNA extraction!
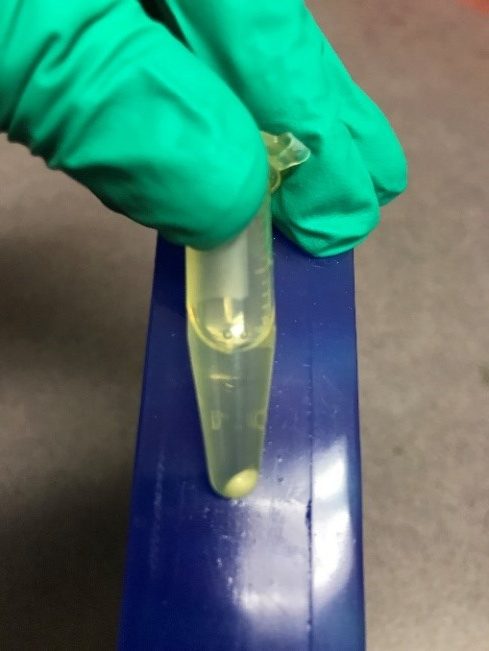
Figure 1: Protein pellet formed after centrifugation. The DNA is in the liquid above.
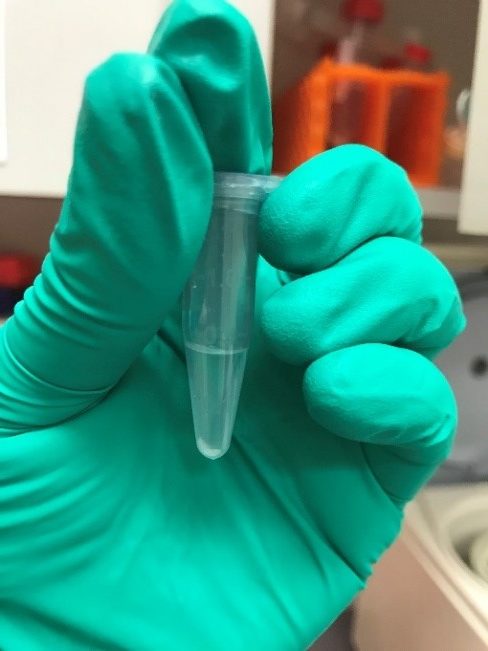
Figure 2: DNA pellet formed after centrifugation with alcohol. The liquid above is alcohol and debris.
Citations:
1. Amplifying DNA does not have anything to do with cloning. We do not want to clone you and cannot clone you even if we wanted to. This amplifying is best thought of as a photocopy machine. The more photocopies we make of your DNA, the more copies we have available to test!
2. Reproductive Genetic Innovations (2021, May 19). Day 4 Embryo Biopsy [Video]. YouTube.
3. Reproductive Genetic Innovations (2021, May 19). Day 5 Embryo Biopsy [Video]. YouTube.
5. The University of Queensland Australia: Create Change. Strawberry DNA Extraction. 2020
Learn how to swab your cheek: https://www.youtube.com/watch?v=-CKq_1m-S6Y
By: Rachel Ingram
Leave a Reply